Start here · 3 essentials
Before you start
Complete these three steps first. Then follow the project walkthrough below.
Create your account and log in
Create a Price Chant account, then log in to your workspace.
Install the browser extension
Use Comp Capture to save comparable listings as you research.
Install Price Chant Comp CaptureGet your asset spreadsheet ready
Use your own .csv, .xls, or .xlsx file, or practice with our test asset list.
Open the test asset list (opens in a new tab)Opens in Google Sheets. Download a copy in .xlsx or .csv format to upload when you create your project.
Build your first appraisal research project, from importing an asset list to exporting the supporting workfile. Follow the steps below using the original workspace screenshots.
Step 01
Create a new project
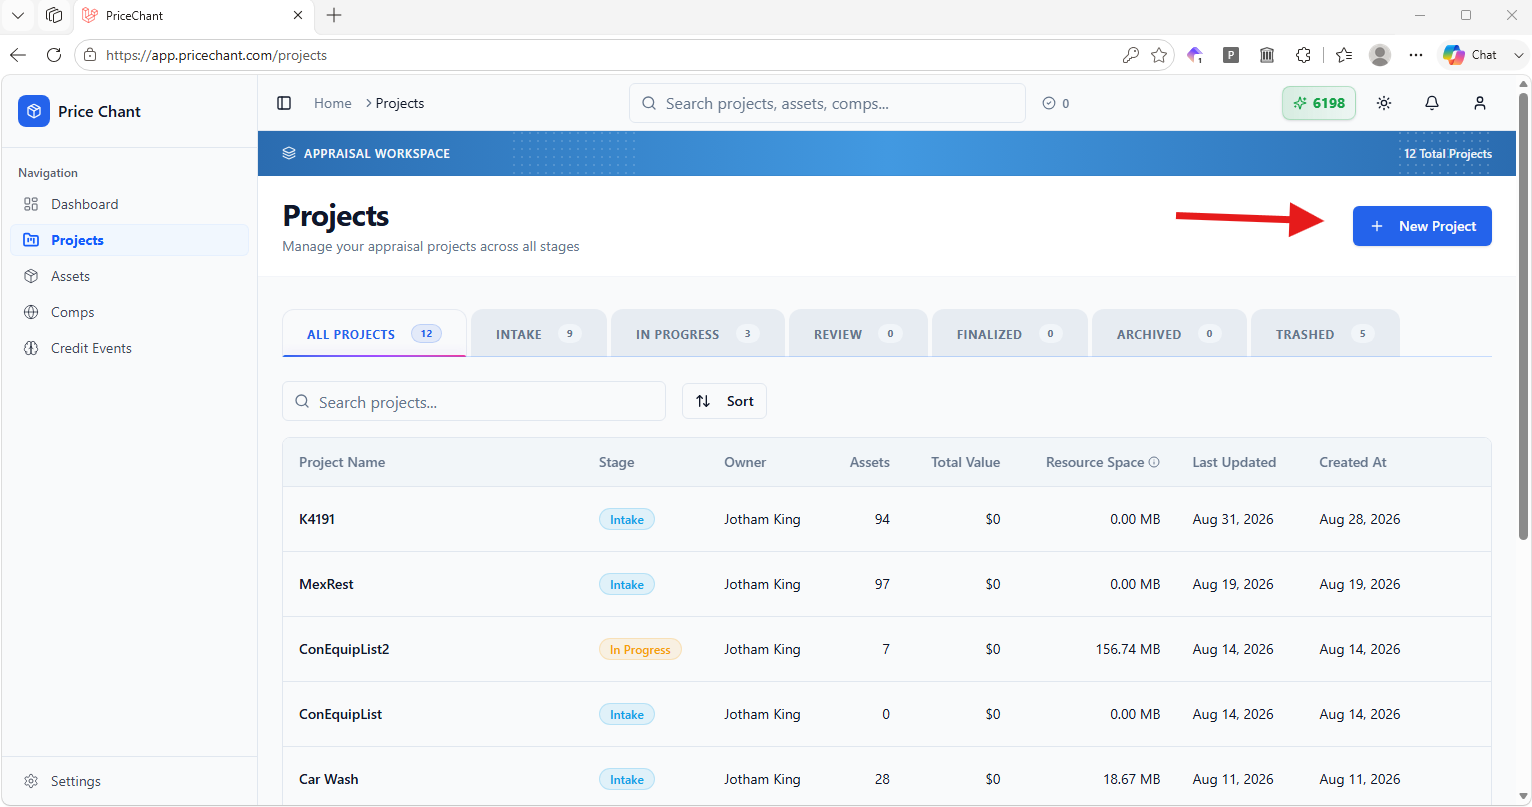
From the Projects page, click New Project in the upper-right corner.
Step 02
Enter project details
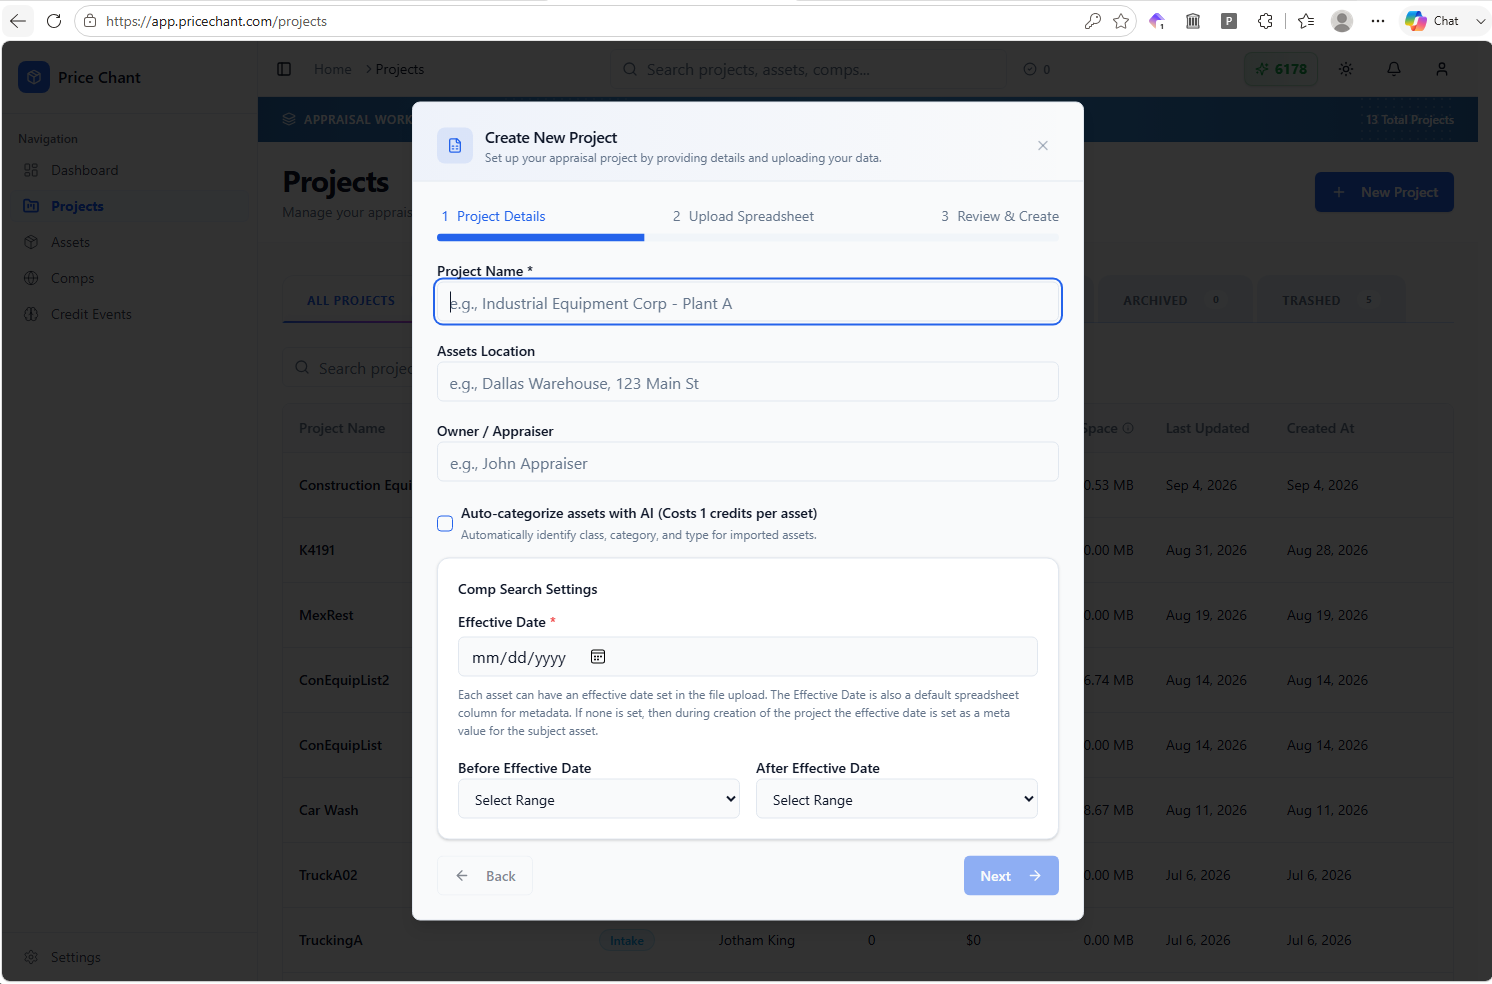
Enter your Project Name, Assets Location, Owner / Appraiser, and Effective Date. The asset location helps guide comparable-sale lead research, while the effective date helps define the relevant sales period.
Review the Before Effective Date and After Effective Date ranges. If you want AI to identify asset classifications, select Auto-categorize assets with AI and review the credit cost shown in the form. Click Next to continue.
Step 03
Upload your spreadsheet
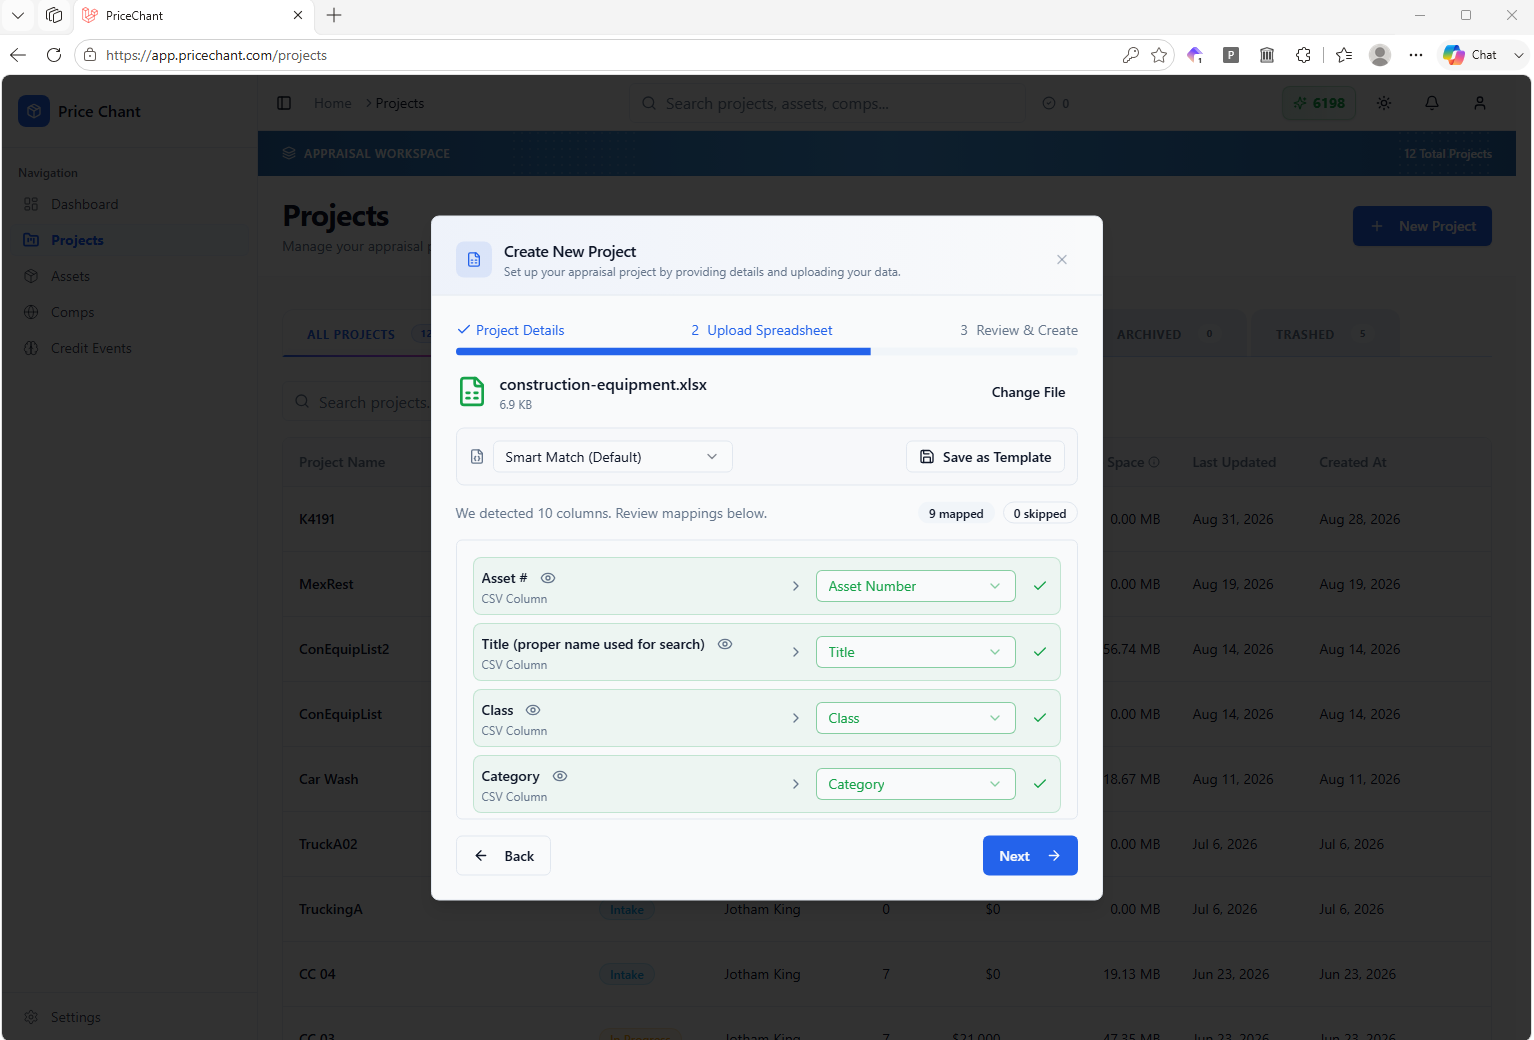
Drag and drop your spreadsheet into Price Chant, or select a file to upload. Supported formats include .csv, .xls, and .xlsx.
Review the detected columns and match each spreadsheet column to the appropriate Price Chant field. Click Next, then review the import and create your project.
Step 04
Open your project
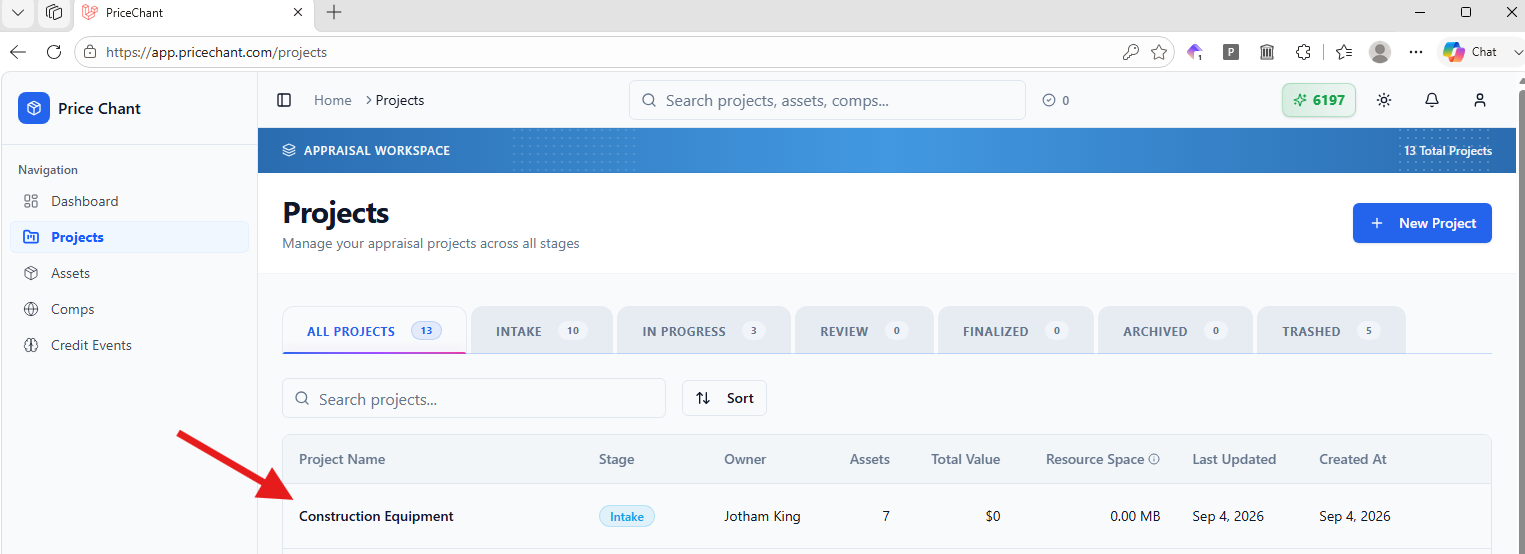
Return to the Projects page and select your project to review the imported asset list.
Step 05
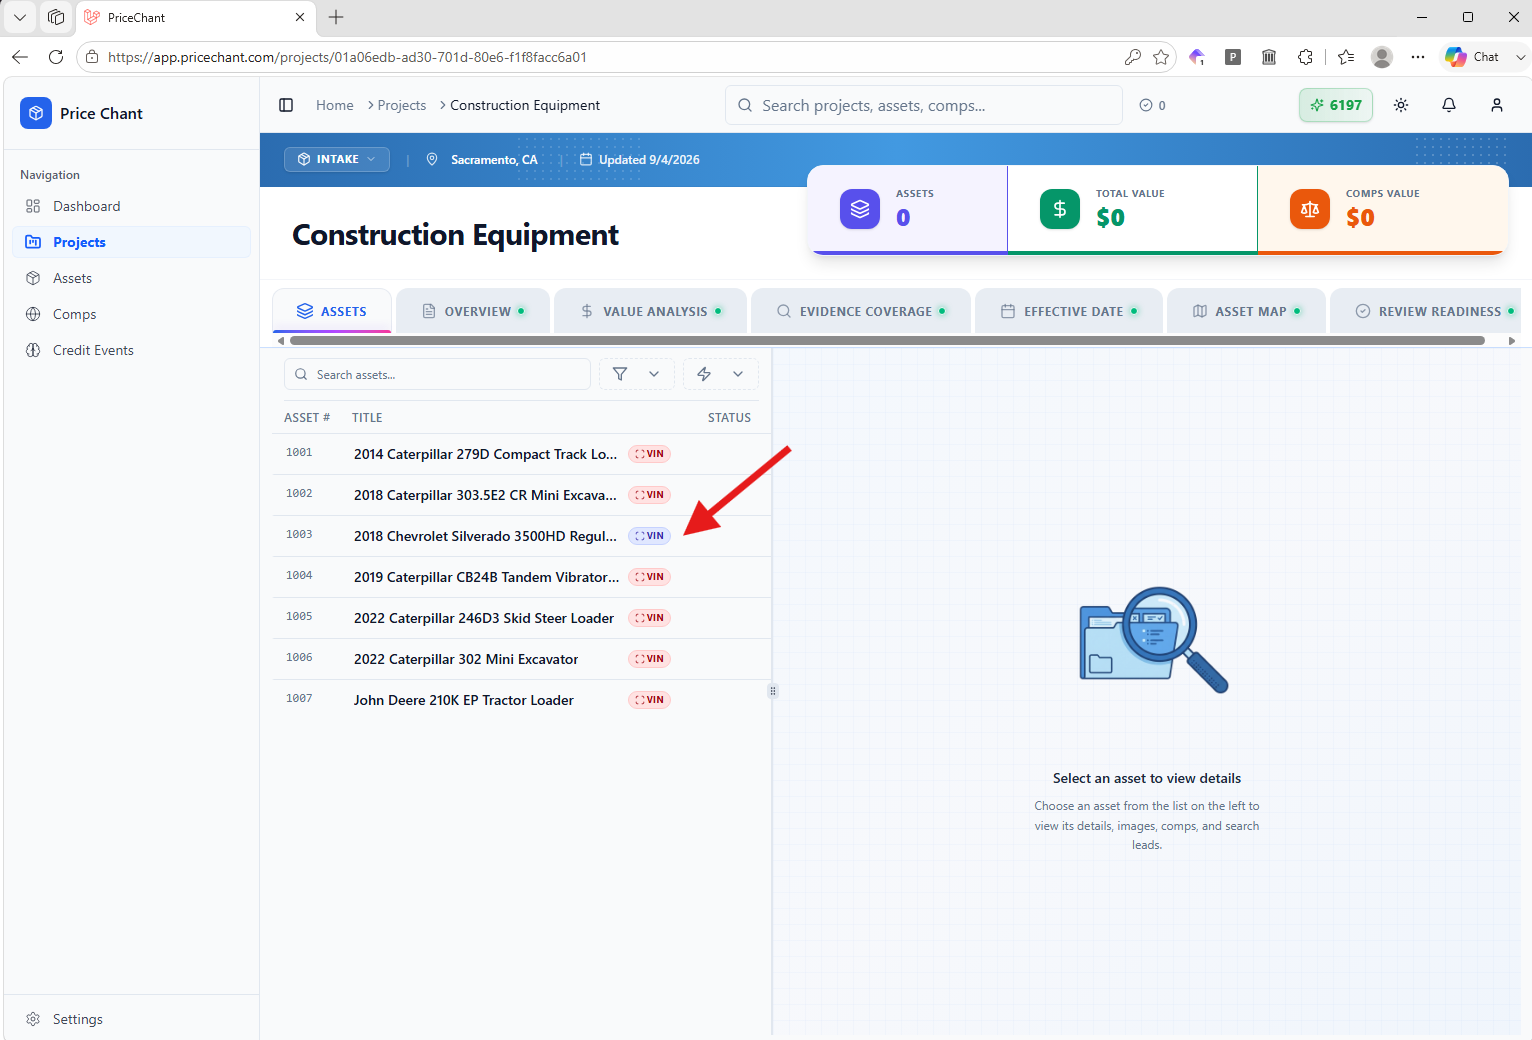
Review VIN details
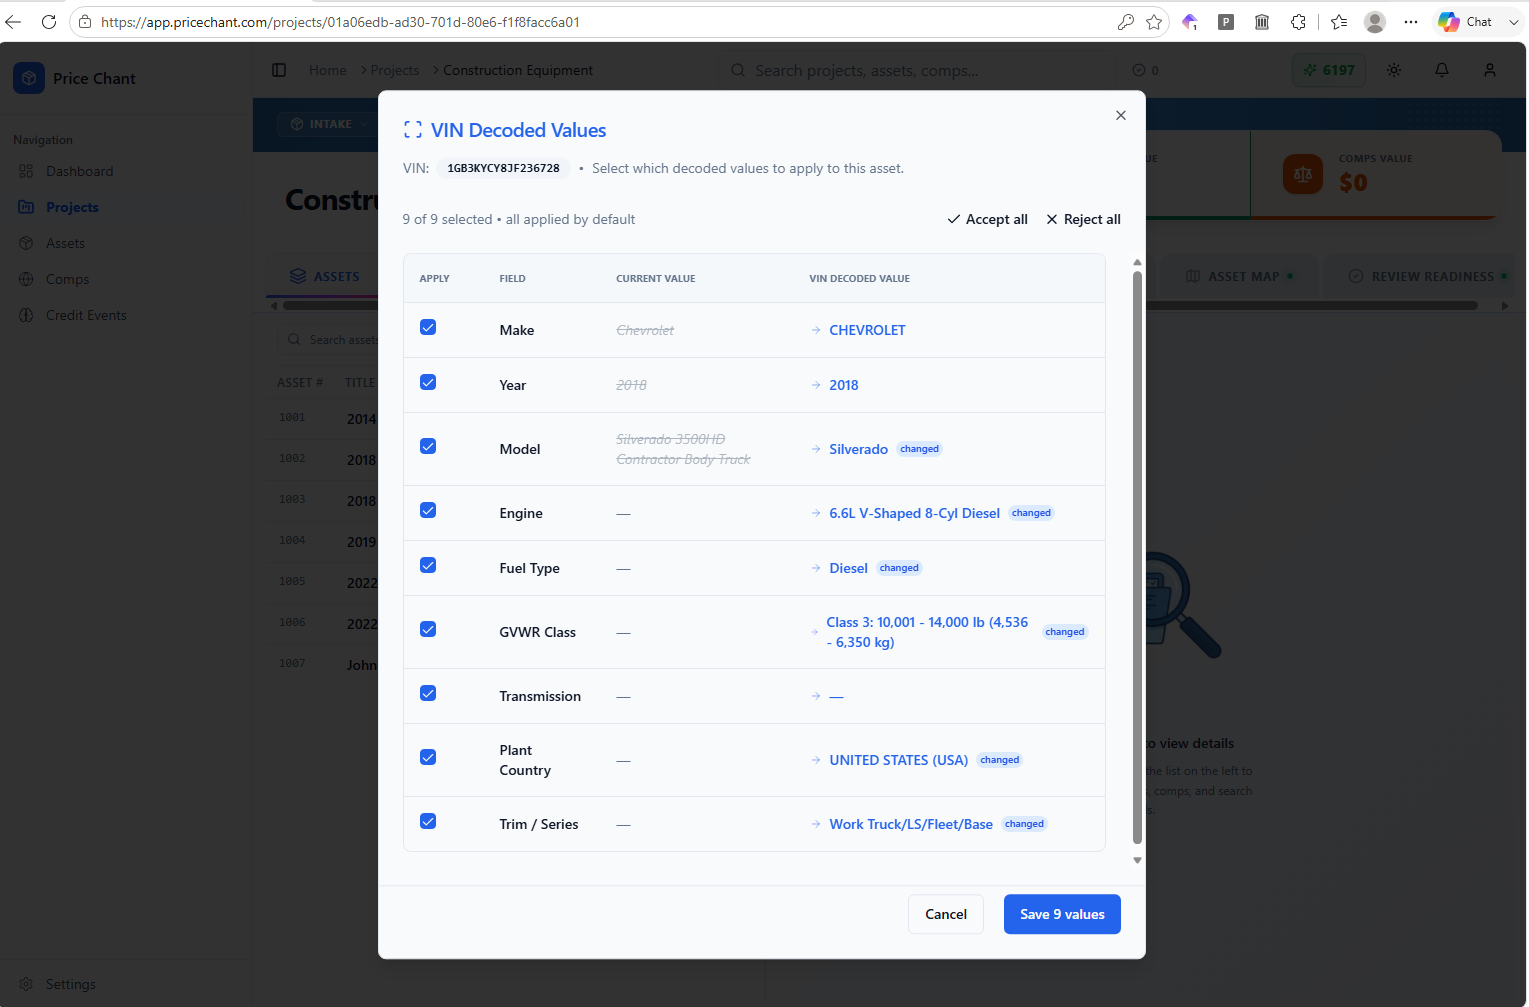
Price Chant detects available VINs in your imported assets. Click the VIN indicator beside an asset to review any decoded information.
Check the decoded values against the current asset details, select the values you want to apply, and save your selection. Some equipment identifiers may not return decoded information.
Step 06
Start lead searches in bulk
To search for leads across multiple assets, open the lightning bolt actions menu and choose Bulk Actions. Select Comparable Lead Search, then choose the lead search option for all items in the list to start a search for each asset.
You can also research individual assets using the Leads tab and search options described below.
Step 07
Open and pin the Leads tab
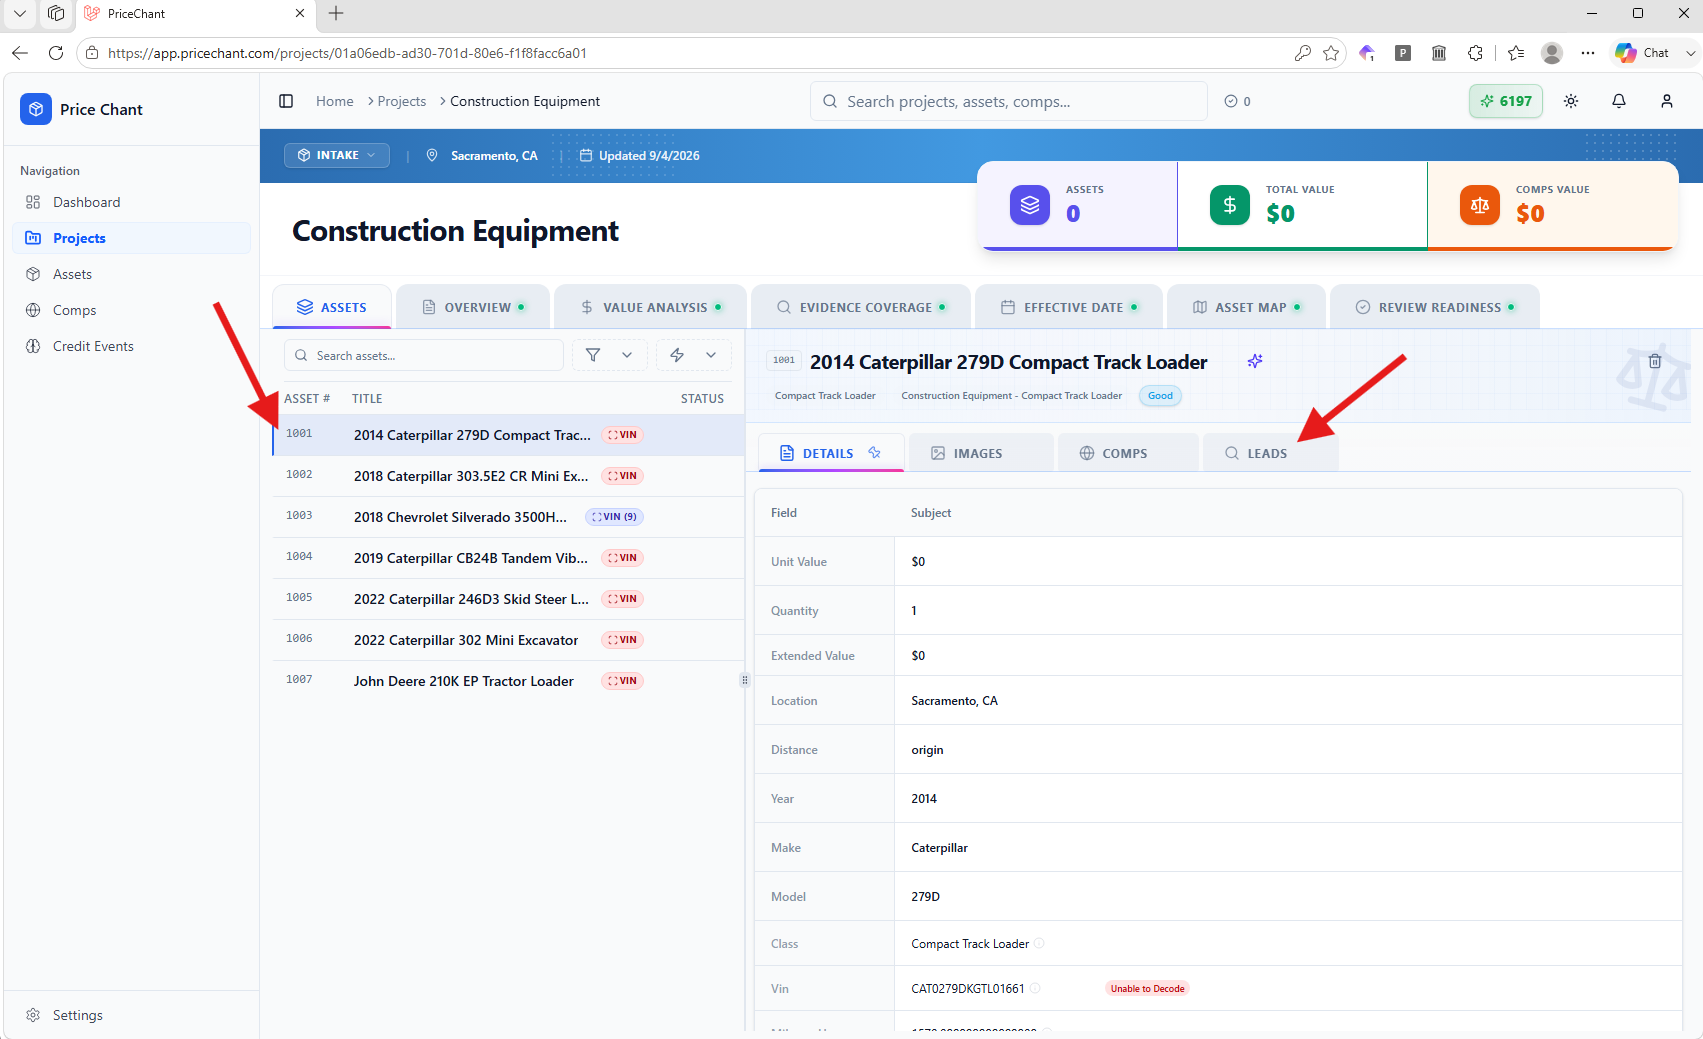
Select an asset, then open its Leads tab to review comparable-sale research for that item.
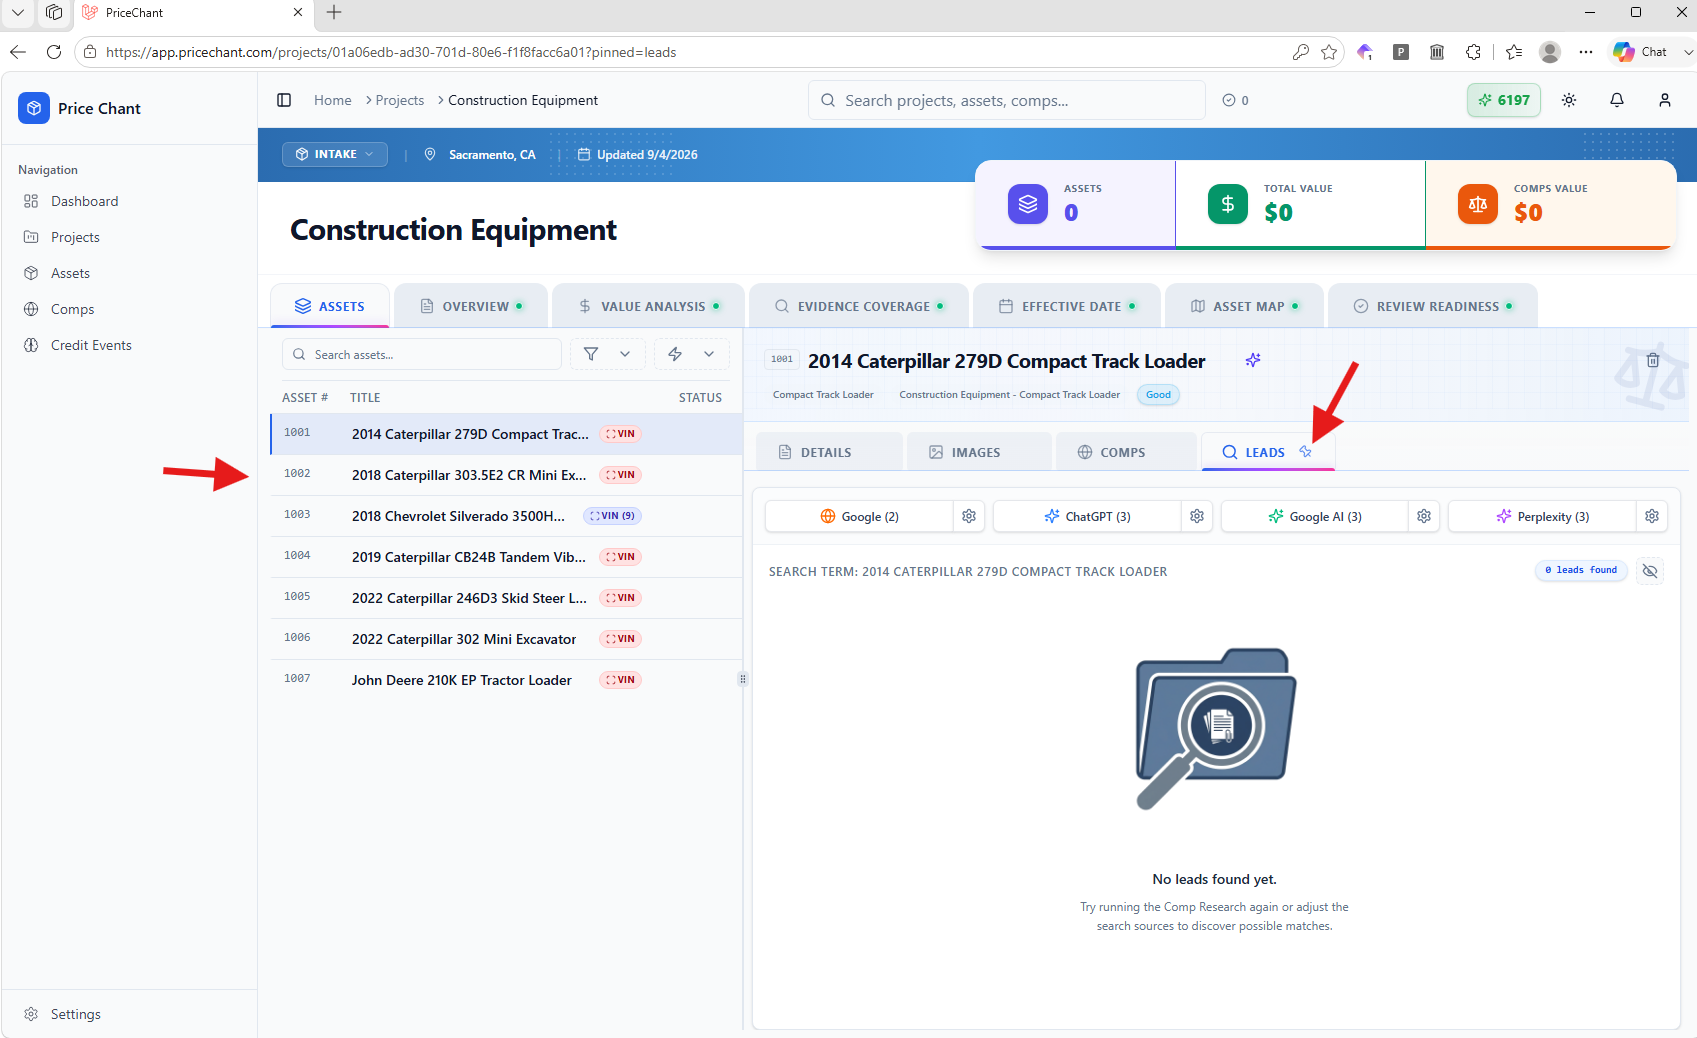
Click the pin icon to keep the Leads tab selected as you move between assets. This makes it easier to work through your asset list without reopening the tab each time.
Step 08
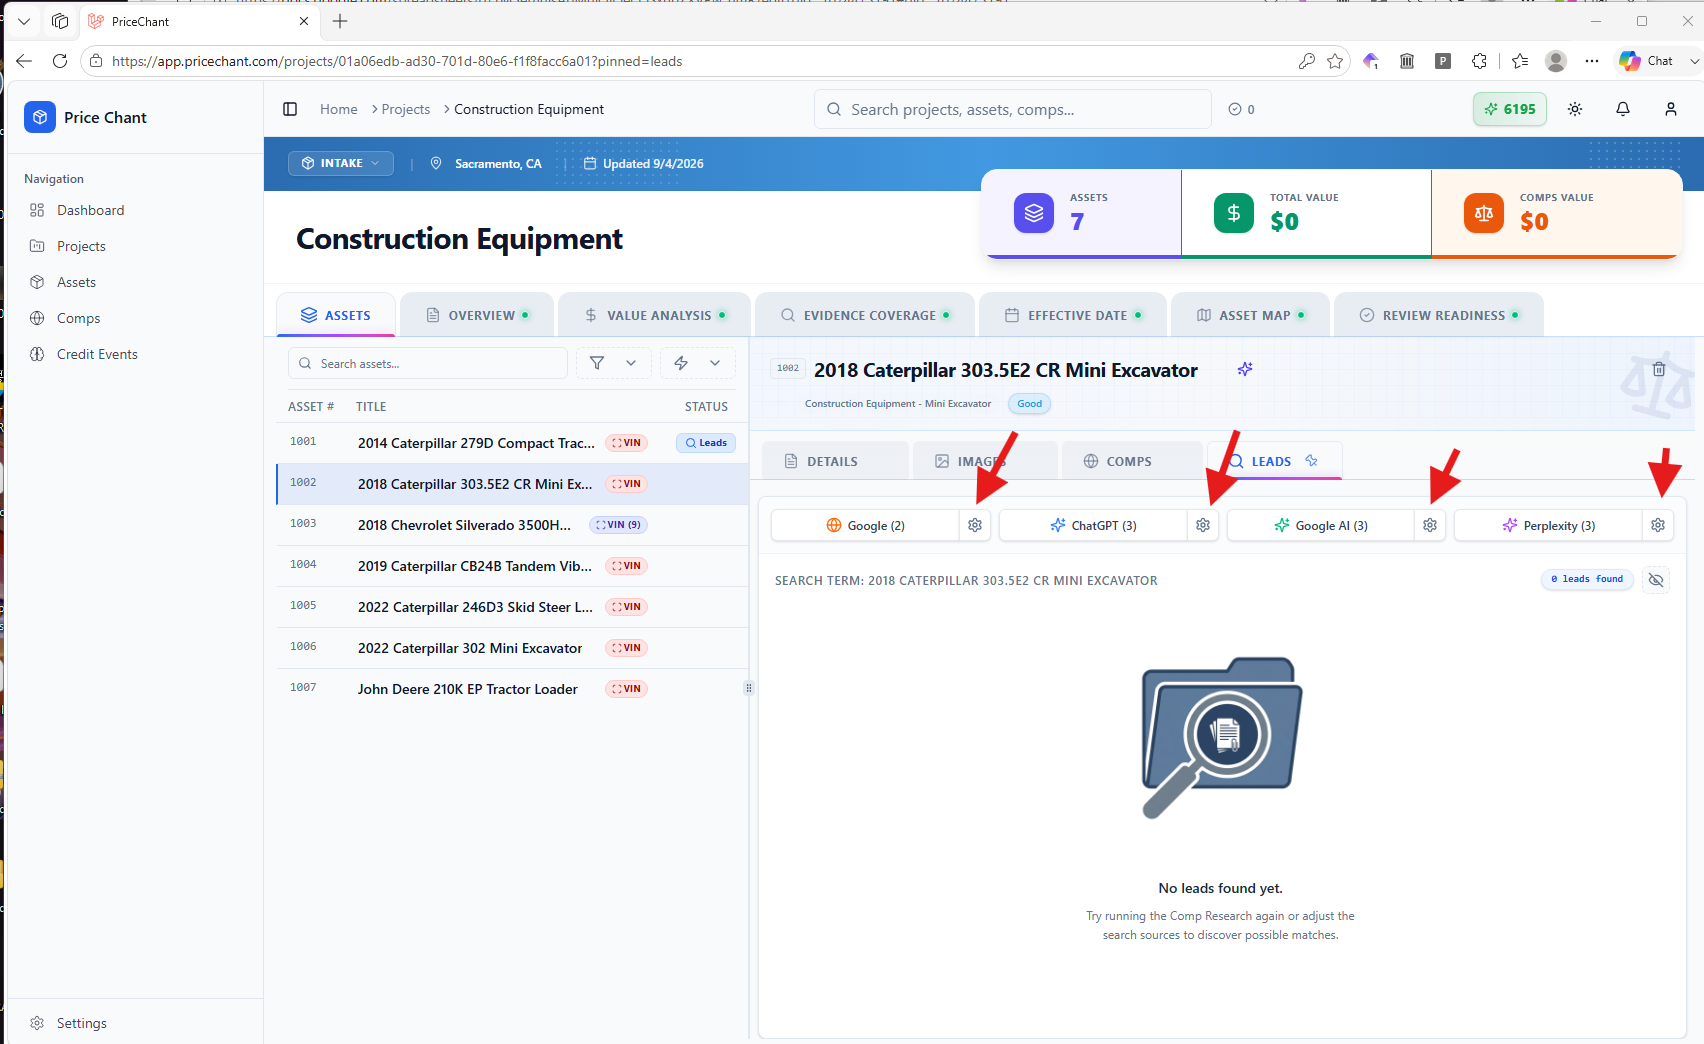
Review search options
Before running a search for the selected asset, review the available sources: Google, ChatGPT, Google AI, and Perplexity.
Use the settings icon beside a source to adjust its search options, then run the search to generate potential comparable-sale leads.
Step 09
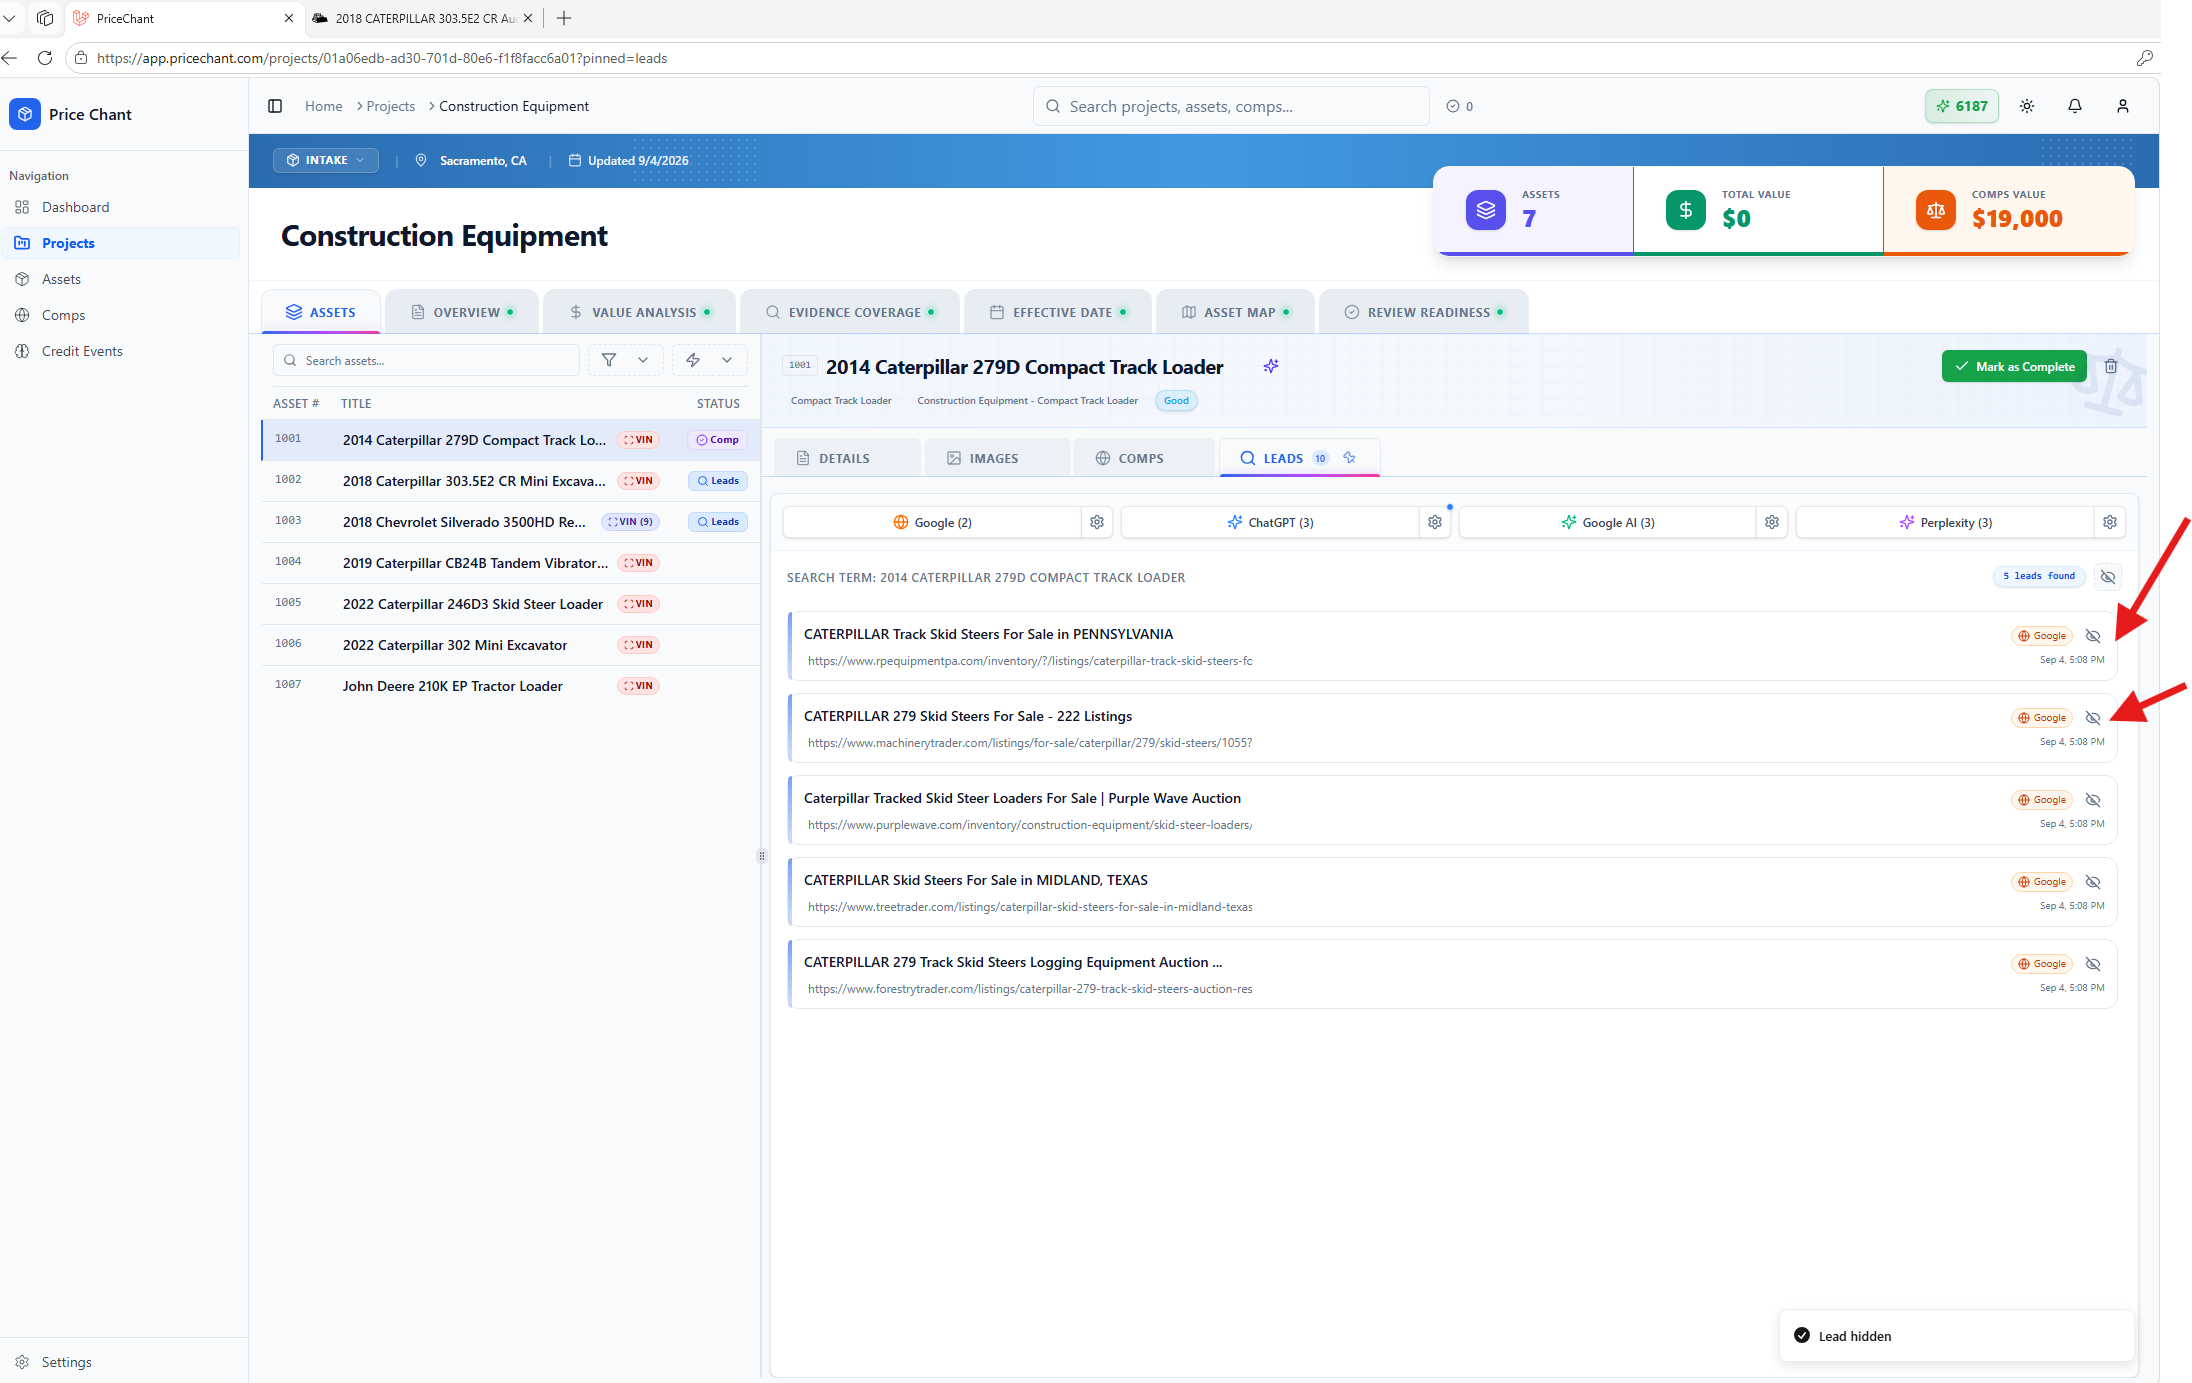
Hide irrelevant leads
Review the generated leads and use the hide icon beside any result that is not relevant to the asset. This keeps the list focused on useful comparable-sale candidates.
Step 10
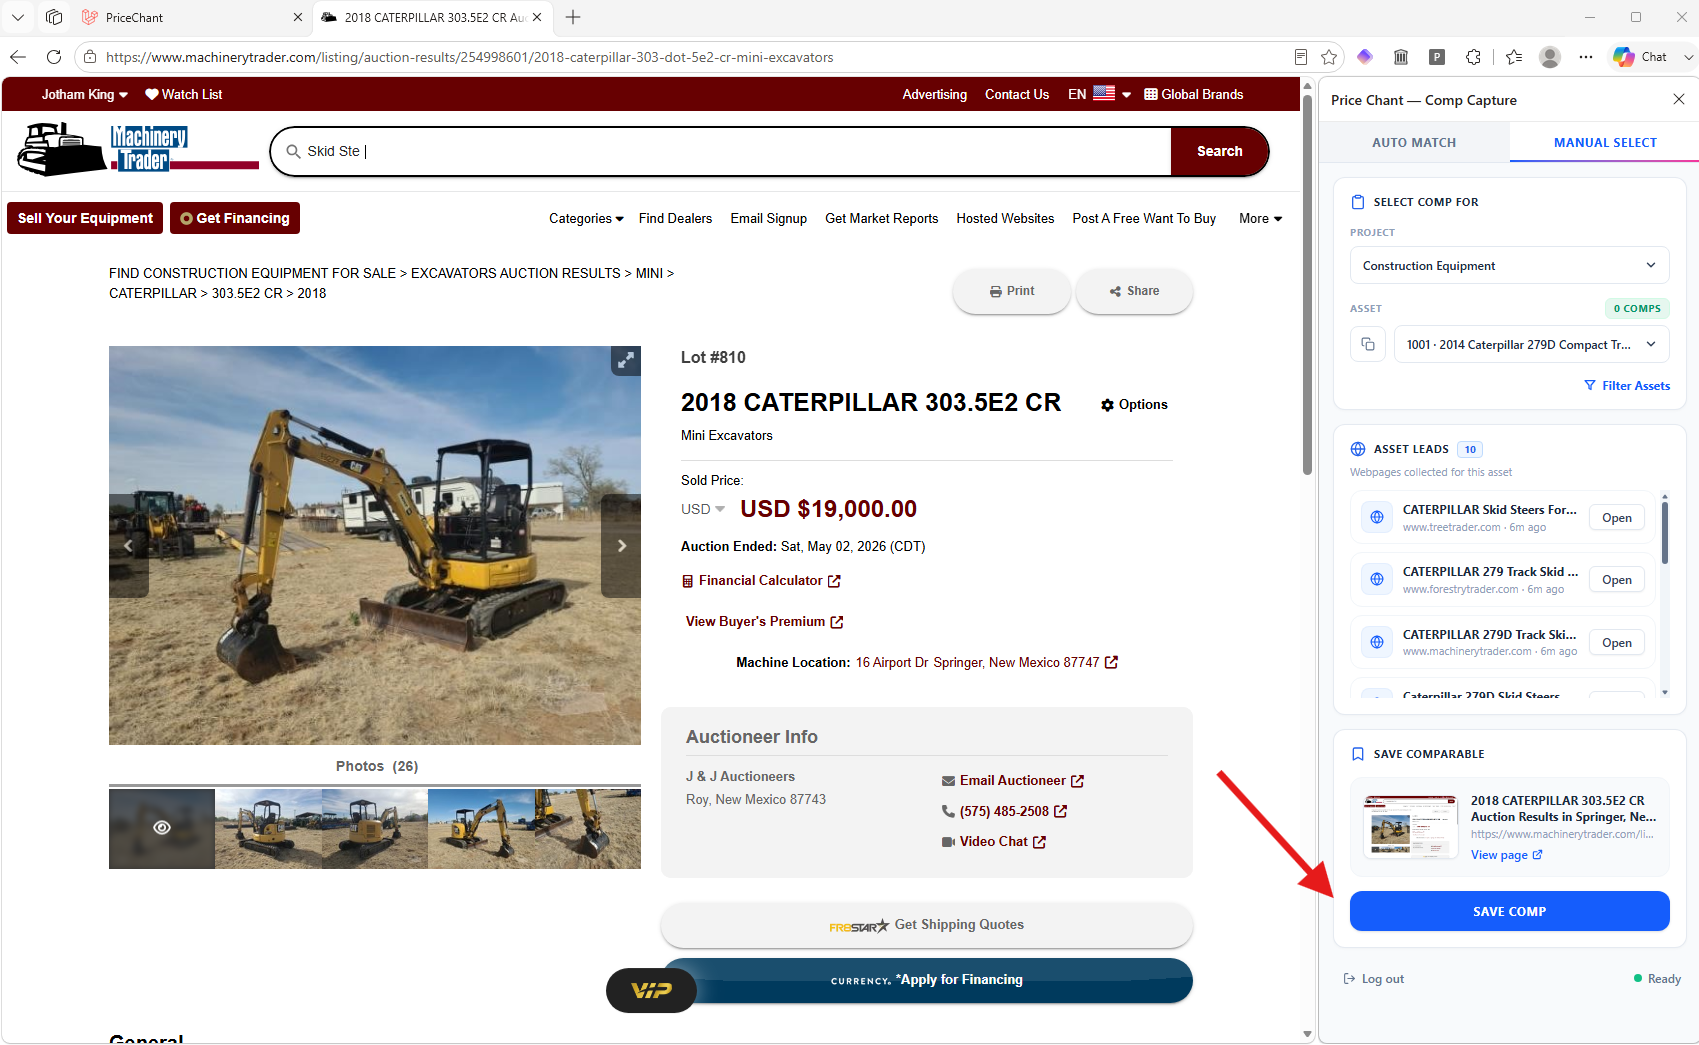
Save a comparable sale
Open a relevant listing and launch the Price Chant Comp Capture browser extension. Select the correct project and subject asset, review the captured listing, then click Save Comp.
Always verify the asset selection before saving. The comparable must be attached to the subject you are researching; the listing and selected asset shown in the example are different equipment models.
Step 11
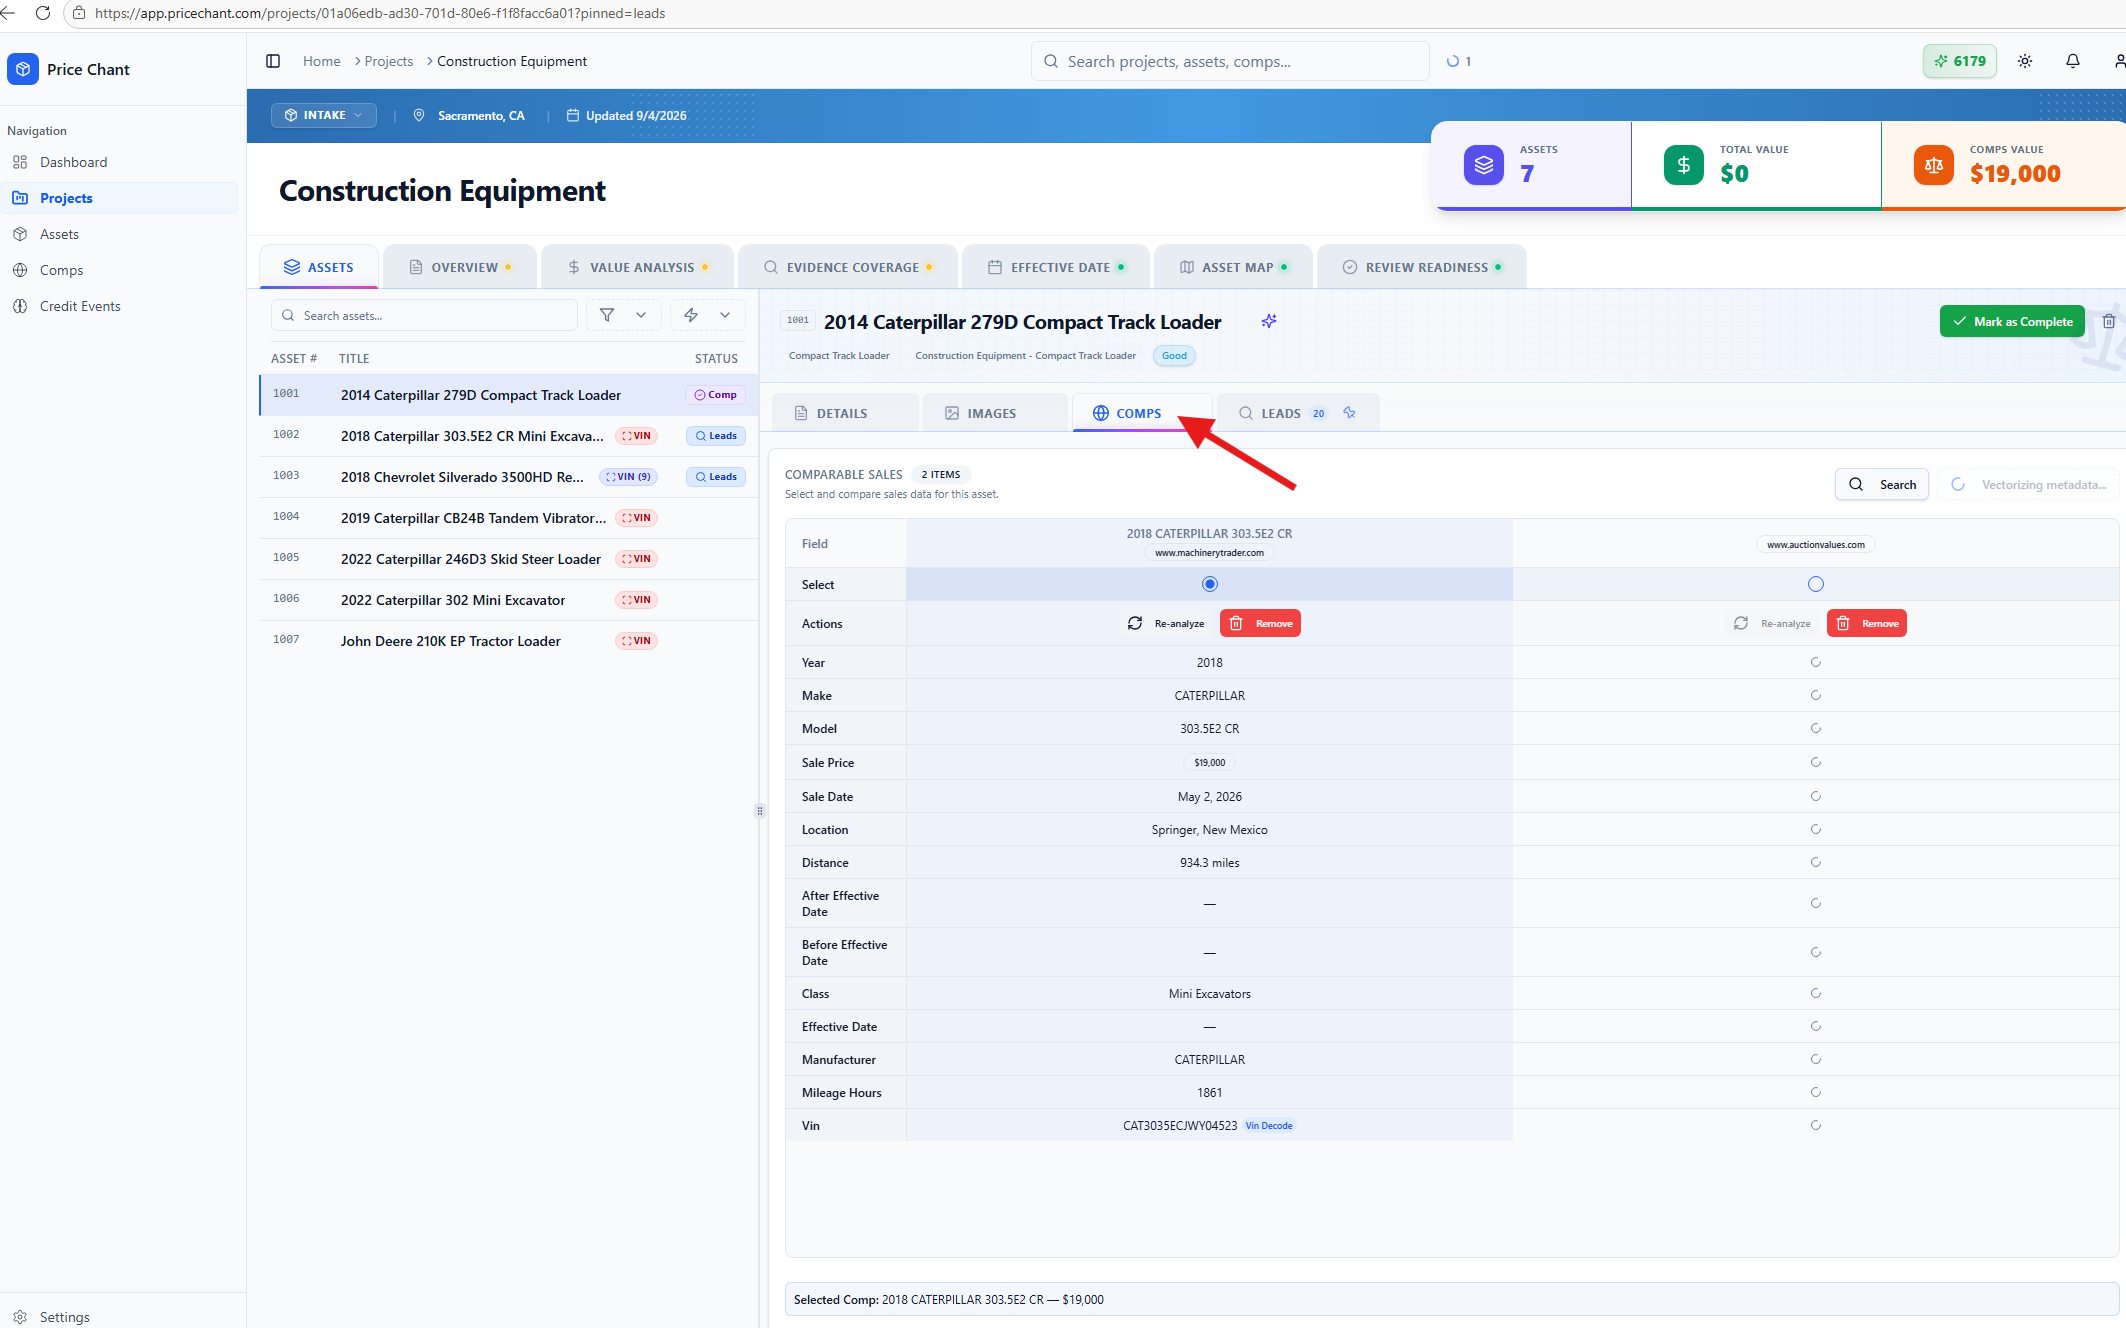
Review comparable sales
Open the Comps tab to review the comparable sales saved for your selected asset. Compare year, make, model, sale price, sale date, location, mileage or hours, and other available specifications before selecting the most relevant comparable.
Step 12
Add more assets
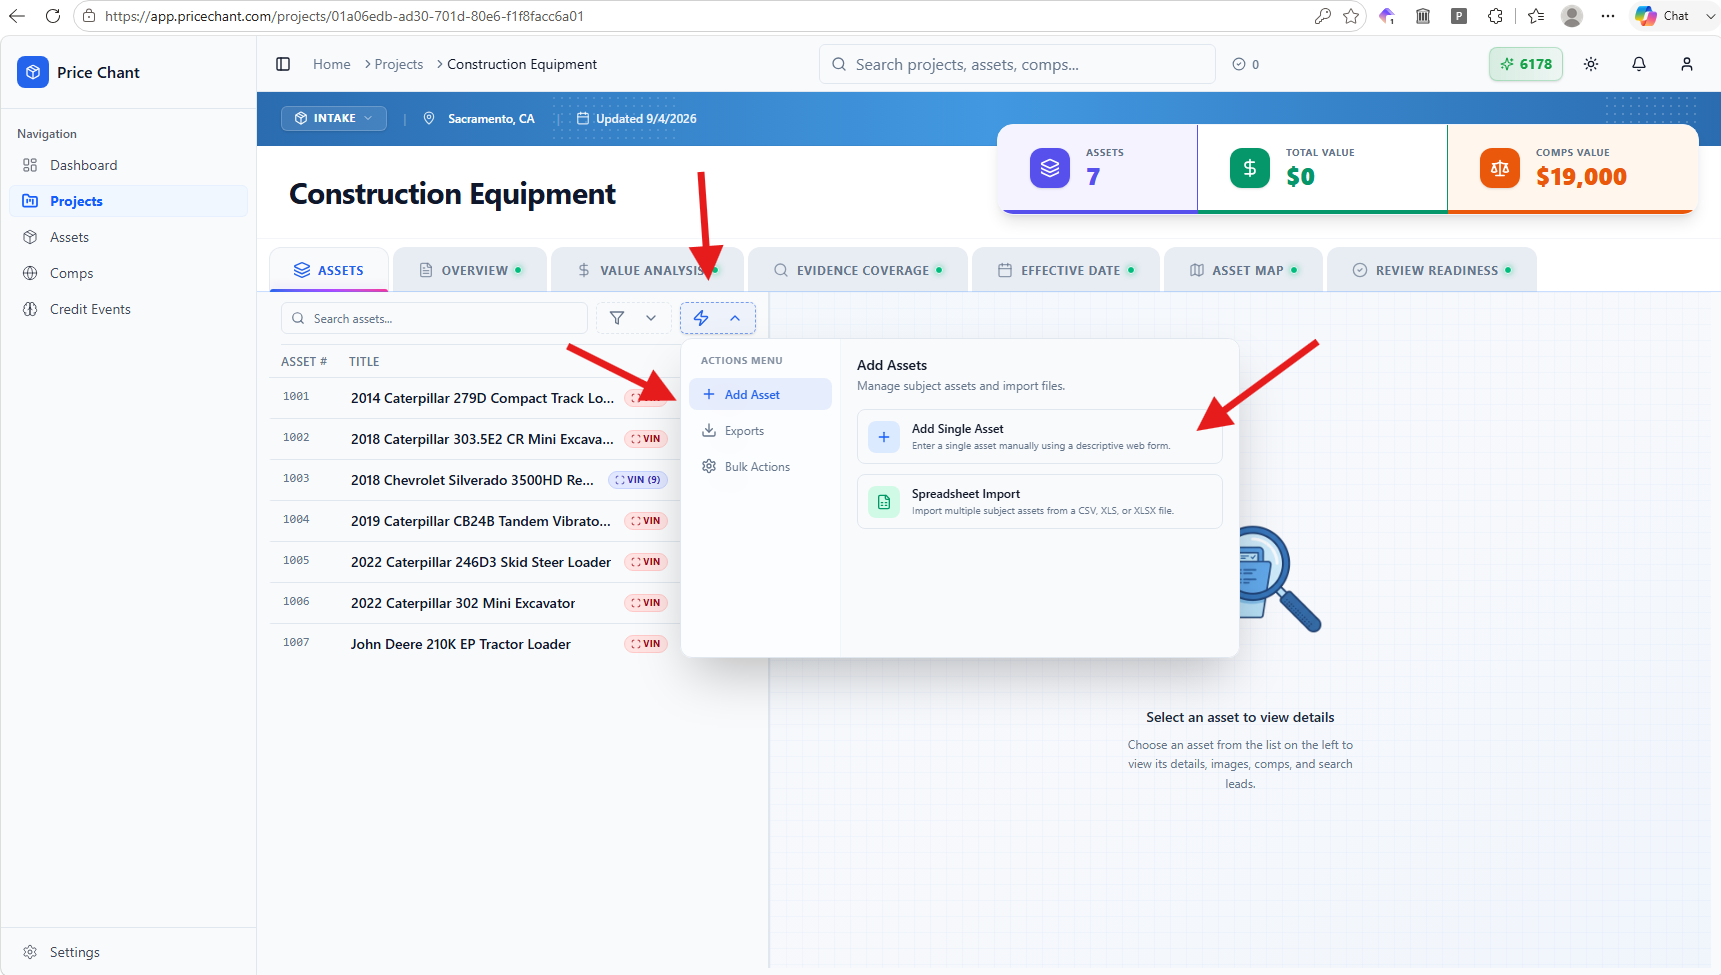
Open the lightning bolt actions menu and select Add Asset. Choose Add Single Asset to enter an item manually, or Spreadsheet Import to upload multiple assets from a .csv, .xls, or .xlsx file.
Step 13
Export your project
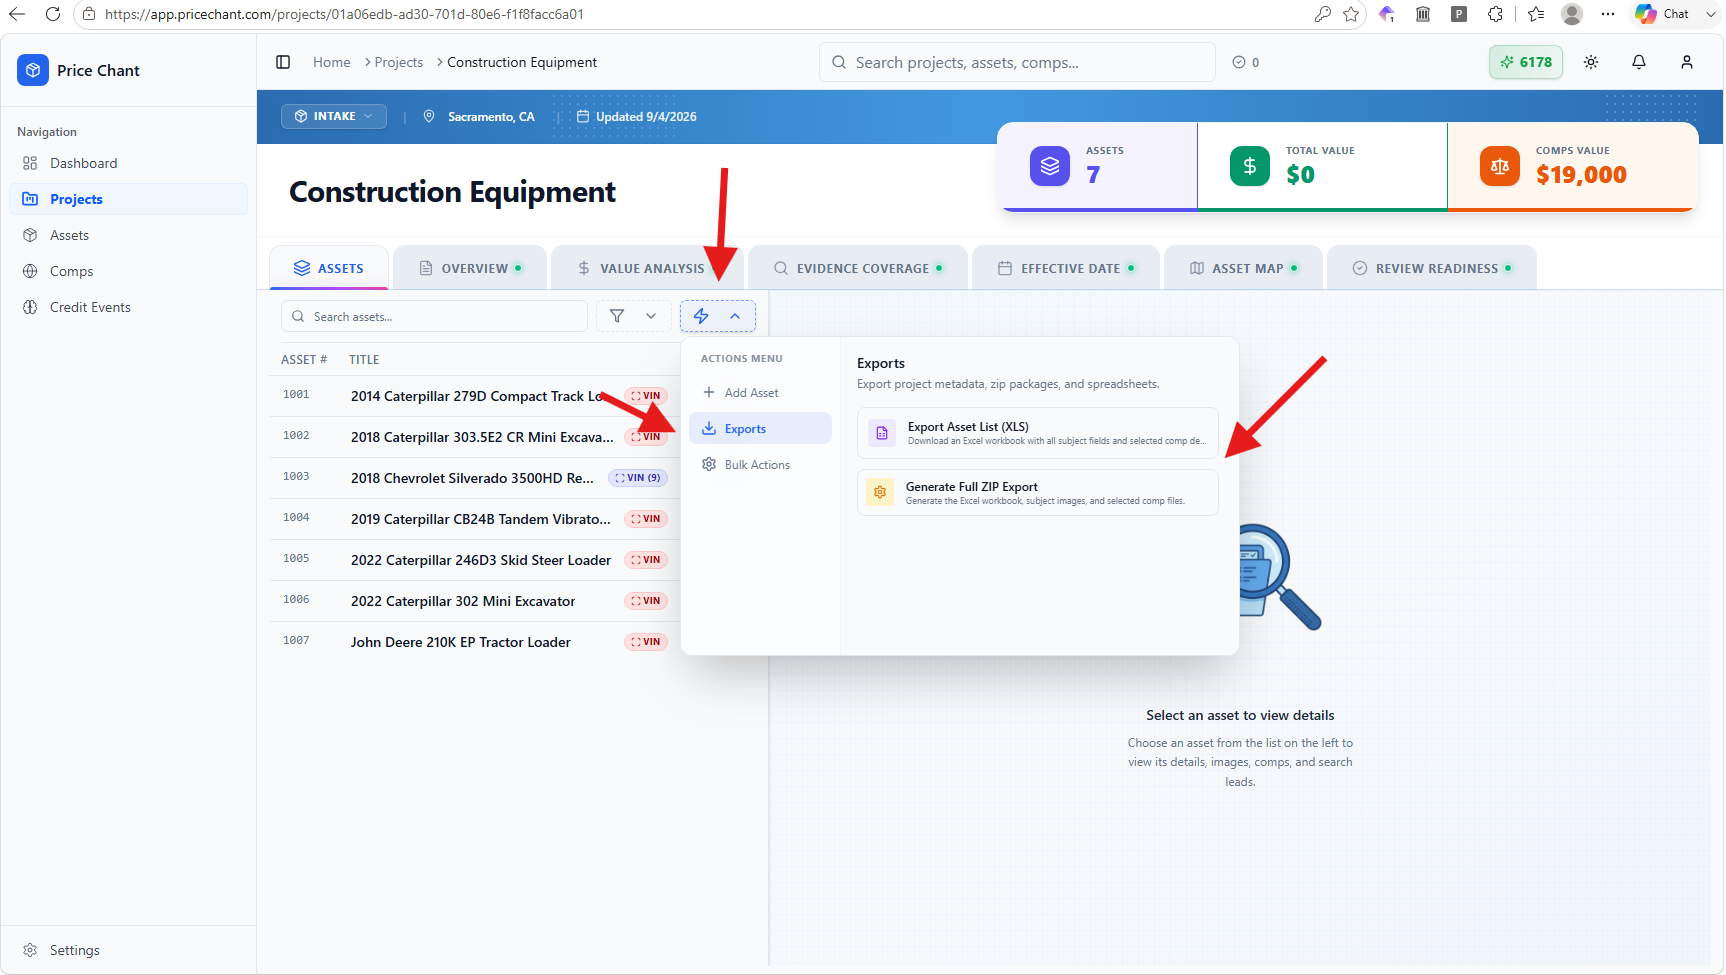
Open the lightning bolt actions menu and select Exports. Choose Export Asset List (XLS) to download the project spreadsheet.
Choose Generate Full ZIP Export to download the spreadsheet together with available project images and selected comparable files.
Need a hand?
For questions about getting started, contact pricechant@gmail.com.
Pull defensible comps, keep the reasoning tight, and ship the workfile faster.
Explore solutions